ZPacks Sleeping Bag Review

Pam and I love cycle touring, and if you check out our gear list you know that we hate lugging extra weight. Our previous sleeping bags collectively were weighing in at around 4 lbs (1.8kg) each. Considering that our total gear weight was about 50 lbs, the bags accounted for almost 10% of the weight we were carrying. After some research I decided to try to reduce that weight and try out the Zpacks ultralight sleeping bags.

A woman laying inside a green sleeping bag on top of an air pad.
Z-packs sleeping bag


About the company: Zpacks is the brain child of an avid ultralightweight hiker, and they manufacture most of their products in Florida and are currently some of the leaders in the ultralight hiking market. Since Pam and I try to support people who provide good products and pay their employees well so it is easy to support Zpacks.

Spec: Zpacks sleeping bags are available in four temperature varieties: 40F, 30F, 20F, 10F. They come in 5 different sizes based on your height, and 2 widths based on your girth. Either 900 fill or 850 fill water resistant down is available. The outer and inner fabrics are Pertex GL, a durable, lightweight material.

size comparison for xped sleeping pad and z pack sleeping bag
Z-pack sleeping bag and xped sleeping pad

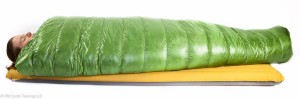
About the bag: The fabric feels similar to other tech materials: smooth, slippery, and thin. This doesn’t bother me at all. Most of the time I do use a silk liner, but that is mainly to keep the bag clean or to sleep on top of the bag during warm nights. The bags are designed to be slept in with the zipper on the ground underneath your back to reduce drafts. While the zipper is small and doesn’t bother me laying on it, I tend to toss and turn all night so I added an optional draft tube to prevent drafts as I do my nightly roll overs.

The bag is shaped so that it is larger at the top of the bag and tapers down to a small foot area. The whole idea is to minimize the space inside the bag which you have to heat up; this will keep you warmer with less extra material and therefore less extra weight. The zipper extends to about ¾ down the length of the bag which is plenty for climbing in and out.

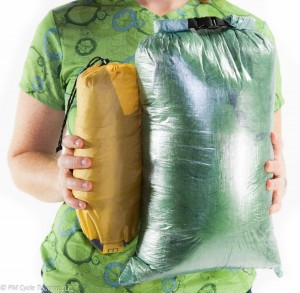
One of the most amazing things about this sleeping bag is how much you can compress it down. Fully compressed it is downright tiny and as soon as you pull it out of the bag it starts inflating back up to full size. With a little fluffing it is perfect every night. The second amazing thing is Matt’s bag only weighs ONE pound. A one pound, 20F rated bag has kept Matt plenty warm even on a 15F night.

Durability: Initially I was very concerned about how the bag would hold up to continuous use on a bicycle tour. In hindsight this is probably a silly worry as a bicycle tour is not any more taxing on equipment than 3 months of hiking which is what this bag was designed for. Through 45 days of bicycle touring on the southern tier, this bag performed like a champ, and continues to perform as expected.

Overview: The Zpacks sleeping bag comes highly recommended by me. The weight and comfort are amazing. This is a great place to spend a little extra money to ensure that you get a warm comfortable night’s sleep and slash a few pounds that you have to carry around on a tour.

Disclaimer: This review contains my personal opinions. I have not received any compensation for this review. This review is for informational purposes only.

New Zealand Lord of the Rings bicycle touring sites

I’m a huge Lord of the Rings fan. I’ve read the series at least once a year for the last 15 years. Of course I was thrilled when the movies were releases, and I was very impressed with the cinematography. When my husband first mentioned New Zealand as a possible bicycle tour, my first thought was: I’m going to get to see Middle Earth.

We’re focusing our tour on the south island, which means we will miss out on Hobbiton and Mt. Doom, which are on the north island. However, there are many iconic vistas and scenes from the movies that we will have the pleasure of witnessing. This list is not all inclusive; I’m sure there are more places to see. But here’re the places I’m most excited to see on our tour of New Zealand.

South Island:

  • Canterbury:
    • Twizel-Fields of Pelennor, where the epic battle took place between orcs and Rohan/Gondor
    • Potts Station-Edoras and Meduseld (Mount Sunday)
  • Nelson/Marlborough:
    • Mount Owen – The Fellowship escape Moria, sans Gandalf
  • Otago:
    • Cardrona Valley/ Mount Cardrona- Panorama View of Middle Earth
    • Arrowtown (Arrow River) Skipper’s Canyon- Ford of Bruinen, where Frodo crosses the river with the elf, the wraiths in hot pursuit, and the water rises up to drown the wraiths.
    • Glenorchy-Misty Mountains
    • Kawaru River, Otago- The Argonath on the Anduin River (computer generated statues)
    • Cadrona Hotel – Prancing Pony (Between Queenstown and Wanaka)
    • Poolburn Dam – Rohan (one of Jackson’s favorite filming location)
    • Sutton Salt Lake near Middlemarch- ambush scenes in Rohan
  • Southland:
    • Kepler Mire, Te Anau – the Dead Marshes
    • North Mavora Lake – The lake at the end of the Anduin River
    • South Mavora Lake- The Fellowship leaves Lothlorien
  • West Coast:
    • Mount Gunn, near Franz Josef Glacier- Warning beacons from Gondor to Rohan

For a list of filming location in Department of Conservation areas along with the GPS coordinates, visit: http://www.doc.govt.nz/parks-and-recreation/places-to-visit/lord-of-the-rings-locations/

If you’ve been to the South Island of New Zealand and have stumbled upon a filming location, sound off in the comments below!

Life and Hills-Metaphors for biking and life

Why are there so many references to hills in our language?

  • An uphill battle
  • It’s all downhill from here.
  • Over the hill.
  • King of the hill.
  • Making a mountain out of a mole hill.

I think hills play a big part of our psyche as humans because they’re so visual. Starting as a little thing in the horizon, it grows and grows, then when you are standing at the base of the hill looking up you finally begin to understand what you are about to undertake. We’ve all climbed a challenging hill, felt the burn in our legs, lungs screaming for air. And then, eventually, the top is reached. With a sigh of relief, you catch your breath, and continue down the other side. Trust me, after our most recent tour in New Zealand, I have an even better appreciation for the incredible feeling of reaching the top of a hill.

But it’s not just climbing a hill on a bicycle. The same goes for any challenge in life that I face. I see it, and I’m a little nervous. Am I ready? Then I face it. I begin, and it may be hard, for a time. I might even want to stop. And sometimes I do. I take a little break, regroup, and collect myself. I might climb off the bike and walk up. But, I keep going, and then, I find myself at the “top,” where I can catch my breath and appreciate all the hard work I’ve just done. With a bit of pride, I continue on until the next challenge, the next hill. And this time, I’m a little stronger, the climb a little easier.

In his book “Spartan Up!” Joe De Sena, the creator of the Spartan Obstacle Course Races describes it perfectly: “To move freely, to breathe fully and deeply, and to have the ability to surmount physical obstacles is a privilege.” Just because something looks hard doesn’t mean it’s not worth doing. In fact, it’s really just the opposite. Every “hill” that comes our way is an opportunity for growth.

As Nelson Mandela said, “After climbing a great hill, one only finds that there are many more hills to climb.” But it all starts with that first one. The next time your route goes across a great hill don’t skip it, don’t go around, look at that hill and realize that hill is exactly why you are out here touring, to see the amazing world in ways that most people don’t, to feel what it takes for you to view the world powered by your own muscles, to conquer anything that mother nature can put in front of you. You can do it.

Eat to Ride, Don’t Ride to Eat

A common question that I get asked when I tell people I’ve ridden a bicycle across country is, “How much do you have to eat?” This is a great question. The answer is complicated: it depends. On our first tour, my husband and I definitely didn’t eat as much as we needed to in the beginning. We struggled with flagging energy levels by mid-afternoon.

At the two week mark, we assessed how much we were eating, versus how much energy we were using every day, and determined that we were eating about half as much as we needed. No wonder we were so exhausted! Once we figured it out, and started eating more and more often, things got a ton better.

I know a lot of people who exercise just so they can eat whatever they want. I can totally understand that. And it is really tempting when you’re cycling 7+ hours a day to go straight to the junk food aisle or the fast food restaurant. Cheap, easy calories are very appealing.

But here’s where I would caution you.  You’re not riding to eat. You’re eating to ride. That food is your fuel. Sometimes you put the low-grade, cheap gas into your car because you don’t have a choice. But if you want your car to perform its best, you usually want to give it the good stuff. The same goes with your body. Yes, it’s about calories and energy. But it’s also about nutrition and vitamins and minerals. Taking a multivitamin, although probably not a bad idea, won’t make up for eating a ton of junk on your tour.

Bottom line is, eat as much as you need to. Listen to your body, and find out what that means for you. By all means, enjoy yourself while you’re out there. Maybe even give yourself a reward for a particularly difficult ride. There is nothing wrong with that. Just don’t compromise your health by eating junk all the time. Eat some fruit and vegetables every once in a while. Buy some whole grain bread instead of bleach cheap white bread. Your body will thank you.