Choosing the Right Lock for your Touring Bicycle

Because Pam and I tour as a couple we always have one person to watch the bicycles while the other runs to the store or bathroom. However, if you want to leave your campsite and hike, or take a day trip somewhere else, a lock can do wonders to ease your mind. Last tour we brought a tiny portable lock on tour with us, which a pair of scissors probably could have cut through. We basically would just lock our bikes together to keep honest people honest. However, there were a few times I wished that I had brought a more substantial lock.

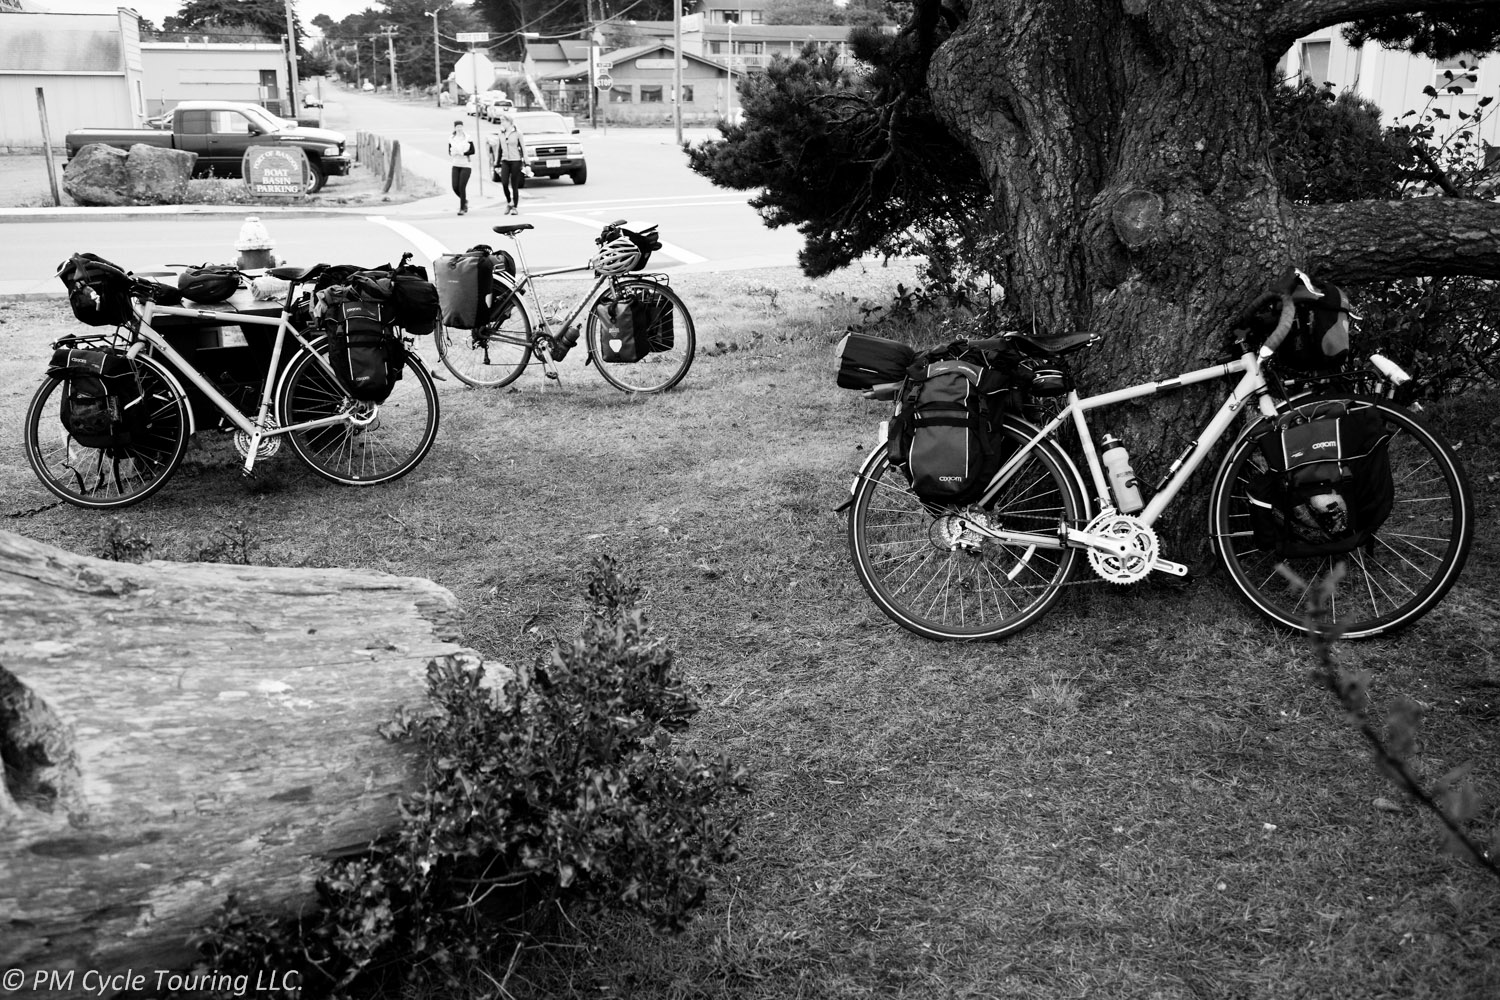
After some research I decided that a frame lock (which attaches to the rear triangle of the bike and stops the rear wheel from moving) is the ideal touring lock. While a frame lock alone is not going to prevent someone from picking up your bike, the fact that it is fully loaded and said person would have to carry 50+ pounds where ever they wanted to take the bike might be enough of a deterrent.

Another benefit of a frame lock is how easy it is to engage the lock, you simply partially twist the key while pushing down on the lock lever and the bike will not roll away. If a bit more security is needed a plug in chain or any cable with loops can be attached to a fixed object. But there isn’t any fiddling with getting a lock out of your bags and finding an appropriate place to attached it. The lock is always on your bike ready to go.

Additionally when the lock is engaged your rear wheel won’t turn. Since neither of us have kickstands, engaging the lock means we can lean the bike against anything we want and it will stay upright and not roll away.

If someone really wants to steal my bicycle they will; no lock can stop that. But this will give me peace of mind that someone can’t just ride away with my life, and it is so easy to use that it is unlikely for me to not lock the bike. It may even allow my wife and me to spend more time together (in case being on a tour wasn’t enough time together anyways).

Bicycle Repair Equipment: 5 Must-haves for your next tour

Where you plan to tour and how long you’ll be out there play a big factor in deciding how much repair equipment to bring. If your tour is in the US on highway and state roads, chances are that you can get away with bringing fewer repair items. However, if you are touring in the Siberian Tundra, you might want to bring everything, including a spare bike if you can! Here are 5 things I think every cycle tourist should bring.

  1. Multitool. Do not leave home without it! Instead of having separate tools in varying sizes, the multitool makes it so much more convenient. You will need this at some point on the tour to make adjustments, or to make repairs. A proper bicycle multitool with the appropriate sizes for your bicycle is very, very important. If you are going around the world the Topeak Alien III  has every tool you can cram in. For something simpler try the Avenir Woodsie 10.
  2. Spare tubes. Even with the world’s best, toughest tires, you will have a flat tire at some point on the tour. Road debris or nails or thorns will most likely cause a flat. Make sure you have at least two spares; we have had valves fall off and other oddities that would have left us stranded if we didn’t have more than one spare. Tube manufacturers recommend no more than 2 patches per tube, however we have easily doubled that. Slime tubes can help prevent tiny holes, but are still susceptible to large punctures; we found them less useful than we hoped. Tubeless tire systems are touted as being better, however a common complaint is the difficulty of riding with them. It is easiest to bring along spare tubes and know how to change a flat before you leave.
  3. Tire Levers. It is much easier to change a flat with these. They are usually cheap and you can pick them up at any bike shop or store that sells bicycles. Make sure you get a sturdy pair; the flimsy thin ones will break. They come in packs of three typically however two is all you really need.
  4. Hand Pump with Gauge. Many hand-held pumps are difficult to use and impossible to tell how much air is in the tire. With a gauge, you know you’re putting the right amount of air in. We’ve tried several small pumps and the Topeak Turbo Morph G Mountain Mini Pump  was by far the best. I would recommend it to any tourist.
  5. Duct Tape. When all else fails, duct tape can be the difference between having to walk and being able to hobble to a bike shop for repairs. We like to keep a roll wrapped around parts of our pannier racks for emergencies. You can use duct tape as a tire boot, to patch clothing/tents, an emergency bandage, and much more.

If you are traveling to extremely remote areas, consider bringing along some extra tools. For example, a chain tool, extra spokes, lube, extra tires, cassette removal tool, pedal wrench, and spare derailleur cables might come in handy. These tools all add weight and take up space, but might be necessary if you are hundreds (or thousands) of miles from the nearest bike shop.


Touring Clean vs. Home Clean

As a woman on a bicycle tour, you’re bound to get questioned on many topics. Even if you’re traveling with a companion, male or otherwise, there are questions that invariably get asked. For example: “Do you ever feel unsafe?” “Why would you want to do that?” “How do you stand not being clean?” The first two questions, I can understand. It’s the last one that gets me, and it’s actually the most common question from other women. Why are women so concerned about this?

Well, I’m here to tell you that modern cleanliness has taken the meaning of clean a little too far. The idea that you have to be stripped free of every bit of dirt and sweat immediately is something that you get over really quickly while on a bicycle tour. You get used to your own smell pretty quickly, in a matter of days usually. And don’t get me wrong, a nice shower at the end of the day feels amazing, but it’s easy to ride and sweat through a day (and sometimes two) without thinking too much about it. A clean bathroom on bicycle tour is a luxury. And you learn to never pass up a toilet, no matter how dirty. Just do your business and get on with it. (You also learn how to do your business behind the cover of a tree, or in a culvert, or pretty much any other opportune place. When you gotta go, you just go!)

And speaking of modern hygiene, let’s talk about body hair. On my first bicycle tour, I was very aware of how quickly my leg and underarm hair was growing out. At home, I can get away with a shave once a week or so, but while on tour it began to seem out of control, as I didn’t even bring a razor. I was more than a little embarrassed about it. After talking to other women bicycle tourists, I came to the realization: it doesn’t matter. You’re riding a bicycle all day. You’re using your own powerful muscles to push and pull pounds of gear, plus your own weight, up massive hills. What does a little leg hair matter?

Once I stopped caring so much about it, I felt relief. Like a weight had been lifted from my shoulders. In the present moment, when all that matters is making it to the goal you’ve set for yourself for the day, a little leg hair is irrelevant. Everything gets put into perspective. The simplicity and beauty of the ride should be what you are focused on; this is what your body was built to do. Plus, there’s plenty of time when you get home to lather up or on a rest day (you are scheduling rest days on your tour, right?). Until then, just eat, sleep, and ride!

Girl Trouble

When I told my mom about my plan to ride a bicycle across the country, she had a few concerns. Most were not legitimate (isn’t it dangerous for your future reproductive prospects to ride on a bike seat all day? (It’s probably not)) Some were, though. Invariably, when I talk to other women about cycle touring, they bring up a number of issues that concern them. We’re all adults and humans with daily needs to take care of. Let’s talk about some of these.
One of the most common questions I get asked from potential female tourists is: “Where do you go to the bathroom?” If you’ve never spent much time outdoors, you may have never had to do your business in anything other than an indoor toilet. Here is the short answer: anywhere you can. Always take advantage of a toilet if you see one. Supermarkets, gas stations, and restaurants are all great places to use the toilet. Construction sites typically have porta-potties. Sometimes there’s porta-potties in fields for the fieldhands.
However, there will be some times that you’ll have to go when you don’t have a toilet handy. You’re going to have to squat somewhere. Look for a place off the road, behind a tree or bush which hides you a bit. I take off any high-vis I have on just to make myself a little less conspicuous. If I’m cycling through an area with no trees or anything to hide behind, I use culverts-those pipes that run under the road. It puts me down below the surface of the road, making it a little more difficult to be seen. Remember to try to not go within 100 feet of a water source.
What about menstrual cycles? Well, that can be a little more complicated, but while touring in the United States we have not had a day where we didn’t have a place or two I could take care of this in a restroom. In my experience, the fact that I’m cycling for many hours a day lessens my symptoms. I’ve had a lot of success with tampons. If I need to change it out during a daily ride, I have baby wipes to make sure my hands are clean. If there is no place to dispose of it I have a shovel to bury it in a cat hole. I’ve read about women using an internal cup, and I’m intrigued; I think I’ll try this for my next tour.
Other things that I’ve found that really helps include having a sport’s bra that hooks in either the front or the back. At the end of the day, my arms are usually sore enough that pulling a sports bra up and over my head can be difficult. Also, getting dressed in a tent or inside a sleeping bag can be tricky if you have to pull that bra on. On my last tour, the hooks were a welcomed addition.
As for shaving legs, arms, or whatever else you may be used to shaving: I choose not to shave while I’m out there on tour. Carrying a razor and shaving cream just to try and shave in a dingy camp shower is not my idea of fun. No one is looking at your legs while you ride. If you do stay at a hotel every now and then you can always ask the front desk for a razor.
Don’t let your fear of these issues keep you from riding. You just take care of things as they come. In the end, you just do it. It’s really no big deal. What other concerns do you have?

Powering Your Tour

Now that you’ve decided to go on this crazy thing called a tour and have purchased all the cool gadgets to make your tour awesome, you’re worried that you will be stranded with a low cell phone battery in the middle of nowhere. I’ll admit, I was afraid of this same thing. Ok, maybe not afraid so much as concerned; after all, one of the best things about touring is the ability to unplug and get away from the noise and distraction of the digital world. However there are some amazingly cool apps and doo-dads that require power and can make your tour better and easier. For those of us unable to completely unplug, here are some ideas to help you keep your electronics powered while you’re on tour:

Solar Power.

One thing we found worked for us on the Southern Tier (where it was sunshine and blue skies most of the trip) was a Bushnell Solar Wrap which we kept exposed during our days’ rides, and charged up an internal battery which could then be used to charge any USB device. Additionally the internal battery could be charged from a USB wall charger allowing us to top it off at night or after cloudy days.

The downsides are that it takes ten hours of direct sun to charge fully and doesn’t work in inclement weather. Both of those can be challenges when you are riding a bicycle. The solar charging equipment seems to be a tough product to engineer well, with many solar charging have a large number of negative reviews. This probably shouldn’t be your only method of charging at this time.

Battery backup.

We use a Jackery Bar which is a small battery with a USB port that our devices could be plugged into. Our initial intention was to use this as a backup. We would charge the bar up using any outlet we came across, and use it to give our phones and cameras a boost. This ended up being our favorite option: it charged quickly and lets you use your device where ever you want.

Also in risky situations you can leave the battery bar charging unattended instead of your expensive devices. Our favorite part of this solution is that it freed us from having to sit near an outlet while charging the phone, simply plug the phone into the Jackery Bar and you can now use your phone anywhere. No more hanging out in those lovely state park bathrooms while trying to get a charge.

On the grid.

Any time you’re stopped in a place with a wall outlet, take advantage of it if possible. Plug in your devices when you can. Some common charging spot include hotels, the bathrooms at the campground, or even the local library. Make sure that you ask the owners/operators before charging, however most people are very understanding and willing to help you out.

Conservation.

One of the easiest ways to reduce your charging requirements is to conserve battery power. Turnoff your devices when you don’t need them, put your phone in airplane mode when you’re not using it. I’ve found airplane mode works better than powering it completely down and then back up, which seems to take more juice. Also this allows you to have the phone available and ready to use versus waiting for it to startup. Most smartphones have a widget which can turn airplane mode on and off with one click.

Remember, bicycle touring is all about solving those little problems as they come up. And, don’t forget, it’s not the end of the world if you can’t check your Facebook that night. But with a little pre-planning, you can be as plugged in (or as unplugged) as you want to be on your bicycle tour.


Using Cell Phones While Bicycle Touring: How to get the most out of your battery

Bicycle touring is a great time to unplug from technology, to immerse yourself in the natural world. However, those tiny, handheld computers we call smartphones are so darn handy! Camera, GPS, journaling device, googler, calculator, you name it. They seem to be too useful to leave behind. Although I remove myself from Facebook as much as possible while I’m touring, I bring along my phone for all those other useful purposes.

Initially when I started touring I would get so frustrated with my cell phone. Even using it only to make journal entries in camp, I would only get two or three days of journaling on a single charge. This was a newish phone, and I wasn’t using it all day, every day. In fact, I was turning it off when I wasn’t using it. Why was the battery not lasting longer? My husband, on the other hand, seemed to have unlimited battery on his phone. We had the same phone. What was the deal?

Well, turns out I was doing it wrong. Once I changed two simple things, my battery lasted longer and my frustration level lowered.

Airplane mode: I thought that turning the phone off when I wasn’t using it would make the battery last longer. Boy was I wrong. Powering down and powering up takes a decent amount of battery power. Who knew? Well, once I started putting my phone into airplane mode, it lasted for longer. Sometimes a whole week.

If you’ve never put your phone into airplane mode, it is simple. Most cell phones have this mode and you can usually access it in the same menu as the power down menu. It should be as simple as selecting “airplane mode”. This keeps the phone on and lets you use the phone, but turns off the part of the phone that searches for a cellular signals. Without doing this your phone will constantly search for a signal unless you tell it not to. Silly phone! Be aware this will prevent you from accessing the internet or making phone calls, but it is pretty quick to turn airplane mode off if you need more from your phone.

Display brightness: Another battery eater is the display. Most phones have a way to turn down the brightness of your display. Once I turned this down to the lowest setting, even though it was now difficult to see what was on the screen, it saved precious battery power.

Essentially, by changing these two settings, you turn your high powered phone into a low power phone. But the camera and non-internet apps will still work if you need them. If you need to make a phone call or check where you are on the map, simply turn airplane off for a couple minutes then turn it back on. So, save your battery. And perhaps your sanity.

Do you have tips for saving your cell phone battery? Tell us in the comments below!

How to Stay Clean (without a proper shower) While on Bicycle Tour

At the end of a long day of hard bicycle touring, you ride into a primitive camp gritty and grimy from the day’s ride. The sunscreen you slathered on in the morning and then reapplied has now mixed with sweat and dirt and chain grease to give you a nice film on your skin. If you’re lucky, you have a shower waiting for you in that camp. Sometimes, though, you have to make do with what is available. Here’s a few things I’ve done when I have to improvise.

1. The towel rinse: If there’s water available at your campsite, just not a shower, you can still freshen up. I’ve been known to strip down to my sport’s bra and shorts, or even put on a bathing suit, to stand under a spigot. I also wouldn’t shy away from wetting down my towel really well and giving myself a “sponge bath”. It does the trick of getting the grime off and making you feel better.

2. Baby wipes: I’ve used baby wipes in the past. However, these are made for wiping, um, babies, and aren’t particularly durable. I find I need to use a LOT of them to get the job done. On the other hand, I love having baby wipes on hand to clean my hands after changing a flat tire or putting a chain back on. (Yeah, you could just wipe them on your shorts, but who wants to do that?)

3. Bathing wipes: These things are awesome. They’re thicker than baby wipes, and more durable. They don’t fall apart on the first go. The ones I’ve been using lately come with directions on the proper way to wipe (hint, you clean your face first, not last!). Some varieties are biodegradable, too, which is a plus. Although, that doesn’t mean you can just throw them on the ground. (Pack it in, Pack it out!) I bring along a special ziplock bag just to store them until I can find a trash can.

I tend to really enjoy a nice shower at the end of the day so it’s not my favorite thing to do when I have to skip one, but once in a while there will be no other option. And hey, it’s not going to kill you to go without a shower every once in a while. Trust me!


Lessons Learned from my First Bicycle Tour

September 20, 2011
Ferndale, WA to Deception Pass State Park, WA
52 Miles

Woke up early this morning to a beautiful sunrise at Aunt Robin’s house. She made us a delicious breakfast (bison with eggs and hashbrown casserole). Finished up the bike prep, and away we left! We departed at 9am or so, and headed to Bellingham. We got to the bike shop in Bellingham around 11, and picked up two wireless bike computers. The guy at the shop was nice enough to help us install them. Then it was back on the road. We should have eaten in Bellingham then, since it was another 3 hours until we made it to a café for lunch. It was a hard fought 3 hours of riding, too. By then, we had gone 17 miles from Bellingham, only 29 miles for the day, and I was already so tired. That ride through the mountains was beautiful, and we even picked some blackberries, but I wasn’t sure I could keep going. But we did keep going. And going. Past Padillo Bay and Anacortes, up over Deception Pass to Deception Pass State Park. We had trouble finding the campsite, and then had to pay $21, but I’m so glad to be done. Tomorrow will be better! It is 730pm, getting dark, and after a baby wipe refresh, I’m ready for bed!

This was my very first journal entry from my very first bicycle tour. I did pretty well conveying the mood of the day. But there were some details I left out. I didn’t really describe how miserable and tired I was. How I almost broke down and cried 5 miles from camp because I didn’t think I could keep going. We took a wrong turn trying to find the campground and ended up climbing up a steep hill, and I was so dejected and disheartened. If this was bicycle touring, I wanted to quit. But here’s the good news. As I said in the journal entry, it WAS better the next day. And the next. It just kept getting better. I got stronger, and it became easier to enjoy the little moments. There are definite moments bicycle touring when you will want to quit. But there are many more when you’ll just be amazed. At the scenery, at your strength, at how far you’ve come. I’d like to share with you a few of the lessons I learned (from that very first day of touring) that can benefit all of us.

  1. If you shipped your bike to your starting location, make sure you know how to put it back together again.
  2. Train (with distance and weight) before you leave.
  3. If you don’t train, plan for shorter distance days in the beginning until you get stronger.
  4. Make sure you know how many miles you are traveling the first day. Nothing is worse than thinking you’ve already finished the ride for the day, only to find out you have to go 12 miles further.
  5. You WILL get stronger and it WILL get easier.
  6. Eat, eat, eat!
  7. Always have an extra meal, just in case you need it. Peanut butter and jelly sandwiches are perfect for this.
  8. Bring fuel for your stove. Sterno cans just don’t cut it!
  9. You don’t need a pasta strainer! And it’s ok to ship back unneeded things you thought you would need on the trip, but really ended up just being extra weight.
  10. It will be harder than you think, but much more rewarding than you can imagine.

I thought I had prepared myself for that first tour. Boy was I in for a surprise. But the thing is, even though I collapsed onto my sleeping pad that first night and passed out from exhaustion, and even though my whole body was sore in the morning from all the hard work I had done the day before, I never gave up. And everything eventually came together. When I think of that first tour, the difficulties of the first day (or week) are a dim memory compared to the rest of the tour. I’m so glad I was able to push past those speedbumps and keep going. And I’m a better person for it.

You Don’t Need a Hammer on Your Bicycle Tour: Life Lessons

On a recent tour I encountered a particular cyclist who stands out in my memory. Like all tourists, we happily regaled each other with stories and wisdom, swapping tales over a snacks. We talked about gear, and tours, and the weather. And then I noticed something strapped to the back of her pannier: a hammer. I couldn’t believe my eyes. I had to ask. She said that she doesn’t go anywhere without it.
I couldn’t help but think about the wasted energy that this tourist had to expend carrying that hammer thousands of miles. In all of my tours, I’ve never set up my tent in a place that didn’t have some sort of substitute for a hammer. Usually a big rock nearby does the trick. In a pinch I’ve asked fellow campers, and have never been turned down. Even after I told her that, she insisted that the hammer was an essential part of her tool box, and we left it at that.
After we parted ways, I thought about that hammer. Do we all have something like that that we don’t want to let go of? Something we’re hanging onto even though we don’t need to? Is it so obvious to others even though it’s difficult for us to see it ourselves?
I made a resolution that day to let go of some of the stuff I’ve been holding onto. The past is the past, and the only thing that matters is the present. I’ve realized that bicycle touring can be a metaphor for life. Don’t sweat the small stuff. Solve problems as they come. Focus on the road ahead. Don’t worry about that storm that has already passed, enjoy the weather right now.  Keep going. Don’t give up. The climb might be steep, but the ride down the other side makes up for it. Life is like this. It’s full of grit, and pain, and joy, and wonder, and agonizingly beautiful things. It can even be a little scary at times. Live each day proud of yourself for all that you’ve done. But don’t bring a hammer on a bike tour. It’ll only make you tired.